Forcing the Needed Heat Around Your Living Space
When your blower motor isn't working right, it can mess up the heat distribution in your home. Some areas might be warmer than others, and that's not comfy. To make sure the heat goes where it's needed, you can try some simple DIY tricks. First, check if all the vents in your rooms are open and not blocked by furniture or stuff. Then, see if your air filters are dirty or clogged because that can slow things down for the blower motor.
If the airflow is still not good, you can adjust the fan speed on your thermostat. A higher fan speed pushes more warm air around. To get the direct heat where it's needed. You can close off unused rooms or adjust duct dampers.
Troubleshooting blower motor problems and making sure heat spreads right in your home. It's essential for a cozy and comfortable living space. With these tips, your heating system will work great and keep every corner warm.
Identifying Blower Motor Problems
Spotting problems with your blower motor can be a bit tricky. But with the right knowledge and some troubleshooting, you can figure things out. Here are some common blower motor issues to watch out for:
Lack of Airflow:. If your HVAC system isn't blowing enough warm or cool air. It might be a sign that the blower motor isn't working fine.
Strange Noises:. Unusual sounds like squealing or grinding coming from your system could be a sign of trouble. with the motor's bearings or fan blade.
Starting or Stopping Issues:. If your blower motor won't start or stops running suddenly. It could mean there are electrical problems or the motor has given up.

Repairing Blower Motor Problems
Fixing blower motor problems can be a money-saver and prevent a lot of frustration. Sometimes, you can handle the repairs yourself without needing a pro. Here's how to deal with a couple of common blower motor issues:
Lack of Airflow: If you're not getting enough air, it might be because your blower motor is dirty. Dust and gunk can build up and clog it. To clean it, first, turn off your HVAC system. Find the blower motor and take off the cover. Use a soft brush or compressed air to gently clean the motor and get rid of the dirt.
Faulty Motor Capacitor:. The capacitor helps start the blower motor. So, if it's not working right, your motor might not start or could stop unexpectedly. To check it, turn off the power to your HVAC system and take off the access panel to find the capacitor. Look at it closely for any damage like bulging or leaking. If it's damaged, you'll need to replace it with a new one.
Replacing Blower Motors
Replacing the blower motor is sometimes necessary. If other troubleshooting and repair attempts have failed. Although it may seem like a daunting task. But, with the right knowledge and tools, you can replace the blower motor yourself. Here's a step-by-step guide to help you through the process.
Turn Off Power
Label for Future Reference:. It's a good idea to label the circuit breaker or fuse related to your HVAC system for future reference.
Access the Blower Motor
Getting to the blower motor is a crucial step when you're dealing with blower motor issues. To access it, here's what you need to do:
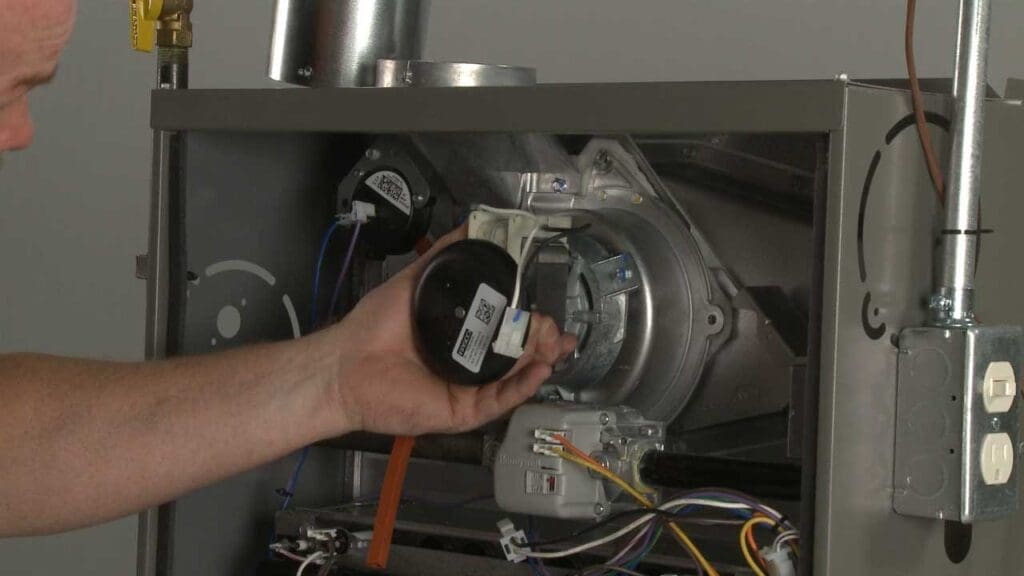
Find the Motor: Locate the blower motor. Usually, it's tucked away inside the furnace or air handler.
Remove Panels or Covers: Look for access panels or covers that you have to take off to reach the motor.
Be Careful: When you're removing these panels or covers, take your time and be gentle. You don't want to accidentally damage anything else. A flashlight can be handy to see what you're doing better.
Disconnect Wiring
Now that you've reached the blower motor, it's time to deal with the wiring. This is a critical step before you take out the old motor and put in a new one. Disconnecting the wiring is all about making sure you can work on the motor without any risk of getting zapped.
Examine the Connections: Start by looking closely at how the wires are connected. Take note of it or even snap a picture for reference later.
Remove the Old Motor
Here's the exciting part of the blower motor troubleshooting process. Removing the old motor. But it's important to do this carefully to make the transition to the new motor smooth.
Here's how you go about it:
Safety First:. Before you start, double-check that you've turned off the power to your HVAC system. This is a big safety deal. No electrical accidents are allowed!
Locate the Old Motor: Find the old blower motor and see if there are any screws or bolts holding it in place.
Remove the Fasteners:. Gently take out these screws or bolts, being super careful not to mess up any nearby parts.
Lift out the Old Motor: Once it's all unfastened, gently lift the old motor out of its housing. Watch out for any wiring that might still be connected.
Inspect the Housing:. Now that the old motor is out. Take a look at the housing to see if there's any gunk or stuff that might mess with the new motor's performance.
Removing the old motor is a super important step in the blower motor replacement process. When you take your time and stick to the safety rules. You'll have a successful removal and be all set for the next steps in the repair process.
Reconnect Wiring
Reconnecting the wiring is a key step in getting your blower motor back up and running. It is essential for the proper operation of your HVAC system.
Consult Your Notes or Picture:. Check the notes or pictures you took earlier to make sure you're making the right connections. Double-check that each wire is securely fastened to the correct terminal on the new motor.
Handle Wires with Care: Be gentle with the wires and avoid unnecessary twisting or bending that could mess up the insulation or connections.
Secure the Connections:. Once all the wires are correctly connected. Use wire nuts or electrical tape to secure them and prevent any accidental disconnection
Test the System
After replacing your blower motor. it's time to fire up the system and make sure everything is running smoothly. This is a must-do to ensure that your HVAC system is working fine. And, spreading the right amount of airflow all around your living space. Testing the system is the last step in the blower motor troubleshooting process. Here's what you need to do:
Power Up: Turn on the power to your HVAC system and set it to the temperature you want.
Listen and Feel: Pay attention to any strange noises or vibrations that could be a sign of trouble.
Check the Airflow: Go to the vents in each room and make sure the airflow is steady and spread out evenly.
Testing is the final step in making sure that your heating and cooling system is doing what it's supposed to. This usually means checking parameters. Running diagnostic tests, and making changes to fix any issues or odd stuff. All with the end goal of proving the system is reliable and doing its job.


